Anbernic "XX" Handheld Starter Guide
Anbernic "XX" Handheld Starter Guide
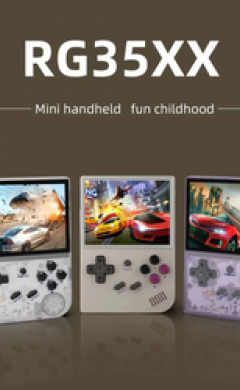
Anbernic's "XX" family of devices is one that I like. There is a design option for almost everybody who wants to feel the nostalgia of playing these vintage games, and the devices receive some incredible support from community developers.
You can turn your favorite "XX" portable into an emulation beast with the help of this method.
Replacement SD Cards
The provided SD cards should be swapped out right away for more reliable ones. These handhelds come with generic SD cards, which are short-lived and prone to failure.
The provided SD cards should be swapped out right away for more reliable ones. These handhelds come with generic SD cards, which are short-lived and prone to failure.
SD Card #1 Setup
Anbernic devices of the XX line have a variety of firmware types. It is entirely up to you which firmware you want to load.
Anbernic Stock OS
Clicking here will allow you to get the stock firmware for your XX device. Write the firmware to the 64GB MicroSD card you bought using the Balena Etcher application.
You may load RetroArch or play games using the stock menu interface in the stock firmware, which offers a respectable experience. If you are new to retro handhelds or prefer an "out of the box" experience, use this firmware.
In Retroarch, navigate to Settings –> Video to access filters and shaders. To ensure that the modifications are retained, make sure to select Main Menu –> Configuration File –> Save Current Configuration.
MinUI
The MinUI for your XX device is available for download here. Additionally, you will require the standard Anbernic OS. The dmenu.bin file should be copied to the stock Anbernic MicroSD card's root. To make a fresh stock OS card, follow the instructions above. Use the correct dmenu.bin file for your device. Additionally, you must use GUIFormat to format your second MicroSD card to Fat32 and add the MinUI.zip file to the card's root.
If you desire a straightforward method of playing your games and want to remove the frontend interface, MinUI is a fantastic firmware. MinUI also lets you go into sleep mode and features a streamlined save state menu. This implies that if you switch the system off in the middle of a game, you can resume where you left off.
With this firmware, there isn't really anything else you need to configure. If you intend to give this portable as a gift, I heartily suggest MinUI.
Knulli
Click here to get Knulli on your XX device. Write the firmware to the 32GB MicroSD card you bought using the Balena Etcher application.
Using an Emulation Station frontend, Knulli is a Batocera fork. With the full functionality of this firmware, you can use PortMaster for some Linux PC games, alter themes, and scrape box art for your games. But for the most incredible experience, this firmware needs some tweaking and is a touch less "user-friendly."
MuOS
Click here to download MuOS for your XX device. Write the firmware to the 32GB MicroSD card you bought using the Balena Etcher application.
My favorite of these operating systems is MuOS. A complete collection of themes, including one from Tech Dweeb, are available for download. PortMaster is supported, and Syncthing is available for syncing and saving. Retroarch cores can be configured by folder directory or by specific games.
SD Card #2 Setup
The way you configure your second SD card will depend on the custom firmware you are using.
Anbernic Stock OS
Just create a folder called ROMs and BIOS on your second SD card. Subfolders for your systems (NES, SNES, etc.) can then be created. You can select the second SD card and load your roms from there while navigating the OS.
MinUI
The second microSD card (the same card you placed the MinUI.zip file in earlier) should have the ROMS, BIOS, and SAVES folder copied over. Before booting your device, make sure your BIOS and ROM files are in the correct place.
Knulli
Include the second SD card when you first boot up Knulli.
Next, select System Settings –> Storage –> Storage Device from the Main Menu. After that, you can move on to the second card and populate the folders.
You will need a Linux operating system, such as Steam Deck, to copy your BIOS and ROM files because the card will be in the EXT4 format. If not, you can move the files to the appropriate locations using network transfer. On his website, Russ from Retro Game Corps provides an excellent tutorial on how to accomplish this.
MuOS
To install your ROM and BIOS files on your device, follow the instructions on the MuOS Wiki.
Recommended RetroArch Cores for Game Boy Games
You can enjoy yourself while using the default settings on consoles like the NES and SNES. However, the following Retroarch Cores might be worth a try for Game Boy systems:
Game Boy: Gambatte Core with "Internal" GB Colorization, "Special 1" Internal Pallete, and "Simple" Interframe Blending
Super Game Boy Enhanced Games: Set the Super Game Boy borders to "Off" and the interframe blending to "Simple" in mGBA Core.
Note: You may need to switch to the Game Boy or Game Boy Color bezel with operating systems like MuOS that have predefined bezels. To accomplish it, adhere to the guidelines listed below:
Aspect Ratio is set to "Core Provided" in Settings –> Video –> Scaling.
User Interface –> Settings –> Overlay on the Screen –> "gbc_ant" is the Overlay Preset set to –> (Landscape) "1.020" is the Overlay Scale.
To save the settings per game rather than each core, go to Settings –> Quick Menu –> Overrides –> Save Game Overrides.
You may play Super Game Boy Enhanced games in full color as intended, thanks to the settings above.
Game Boy Color: Gambatte Core with "GBC Only" selected for color correction and "Simple" selected for interframe blending
Game Boy Advance: "Simple" mGBA Core/Interframe Blending
Advanced Things to Try
Now that you understand the fundamentals, if you want to accomplish more complex things with your XX device, check these other Russ instructions.
- Setting up Syncthing to sync your game saves across devices
- Shaders, Filters, and Overlays
- Portmaster Starter Guide
Some of my other guides are included below:
- Emulating the N64 Transfer Pak
- Setting Up Retroarch on iOS Devices
